The Chatelaine
Apologies to those who thought this would be a beautifully crafted silver gadget for my waist band.
I made this version #2 of a chatelaine when I realised that my previous version #1 was just too long. It tended to slither between my legs on flights so the pockets at the bottom hovered around calf level, leaving me groping oddly under blankets.
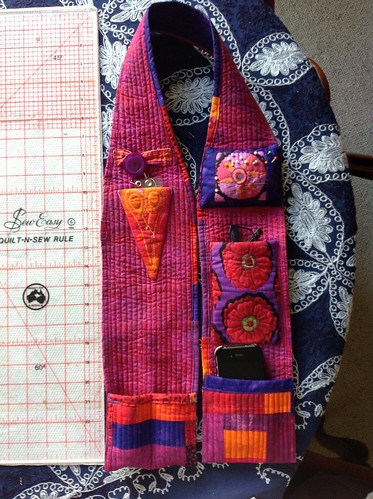
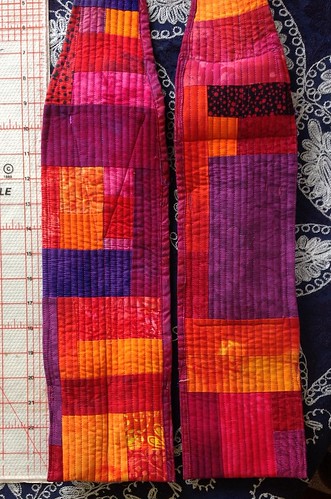
I made a long strip of patchwork in multi coloured scraps, just sewing them together to make a band about 5" wide and a full 58 inches long. I sounds so ridiculous that I just checked it twice, but it is right. I sandwiched this and quilted it simply, knowing I was going to lose some in the centre when I shaped it.
I then tried it around my neck and marked where I needed it to narrow in , so the band at the centre back and actually touching my neck is only about 2 1/2 to 3" long, and it widens fast to curve slightly around my neck and sit like a priest's stole. It should be back to full width just below your neckline. Check that it is comfortable before you bind it.
When I trimmed I had left the back wider by about two centimetres (unquilted edge) on one side, and the front wider on the other. These extra widths I just folded over twice and machined as a binding - so on one side the front 'binds' the back and the other side it is the other way around. It helps me to remember which way to put it on. It actually matters as I like my pin cushion on the left so my right hand can slide pins in easily and naturally. You could easily bind both the same way.
At this stage I decided I like the plainer side better as a front, as I wanted interesting prints and shapes in my pockets. I finished the bottom as I had the sides, then I folded up the bottom four inches on each side and stitched the sides and they became two pockets at the bottom, with the patchwork side showing.
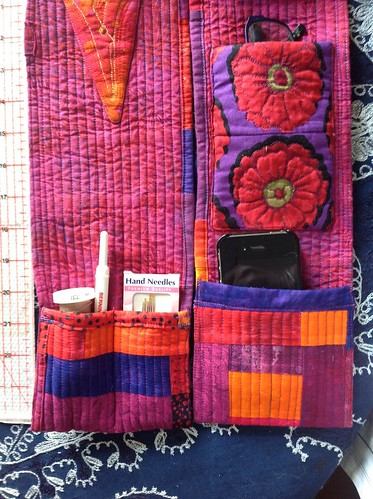
On 4" pocket on the right side I put a centre line of stitching so it holds threads firmly and a quick unpick (seam ripper). The quick unpick does not come on flights! I also put needles in this but they sometimes slide if I fold the chatelaine into a bag - and next time I think I would include a small needle case in the gap which fastens to protect the needles. Maybe one day I will make that anyway. Mostly the ones I use simply sit in the pin cushion, but tucked through, not sticking out. Angle your pins in so they do not stick too far out either.
The 4" pocket on the bottom at the left side holds my iPod or iPhone in planes, and sometimes even while I stitch at the machine as it can play me a talking book through headphones and comes with me if I get up and move around.
I made and quilted two other pockets.
I drew around my most commonly used scissors and quilted and faced a triangle that would hold them with just the handles sticking out. I also - just for fun, quilted a design of gold stitched scissors (smaller ones) on the front of the pocket before I attached it.
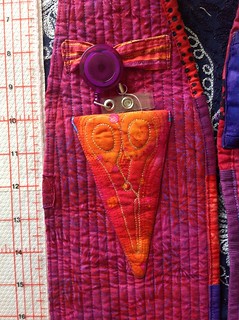
For flights, I added a tab above this, free in the centre but stitched at the sides, so I could attach a retractable security card holder for my airline acceptable scissors. These are fantastic Clover scissors which I bought at Addicted to Fabric. they are truly tiny, but sharp enough to trim fabric.
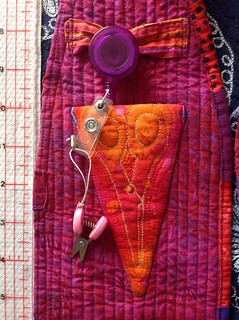 I attached this quite high on the right side so I could easily use the scissors while they were still attached. The top is level with the pin cushion.

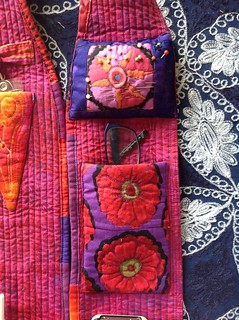
The other quilted and faced pocket sits on the left side below the pin cushion. It is a simple rectangle but for fun I used two daisies to signify that it is for my glasses. I wear glasses - but never for close work. As soon as I start sewing I take them off and it is terrific to know where they are - especially on flights or in classes. No more fumbling for bags and cases or knocking them off the silly fold out table when trying to clear it for a tray of food. Sometimes I wear this on flights without having any sewing with me - just to hold my glasses and phone or iPod and headphones as I travel.
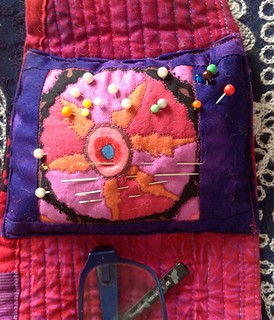
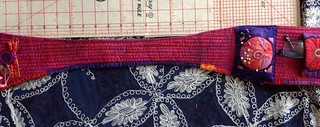
I made a rectangular pincushion about the width of the chatelaine, and quilted it, folded it over and stitched almost all of it, then stuffed it and stitched it closed. I then just stitched around three edges. It has to sit above your breasts or it adds ridiculous levels of bulk in absolutely the wrong place. I like the pincushion on the flat part of my chest, just above the breast.
Important - when stitching on the pincushion (and I had to scrunch the tops in a bit to make it fit as the chatelaine narrowed) - stitch three sides only and stop. Insert something hard behind it so you do not stick pins into yourself - I used a piece of acetate (transparency plastic) folded in four as it is thin and light ( and near me on the table) - but effective - but cardboard or template plastic would do.
And that is pretty much it!
 Jenny Bowker
Reader Comments (7)
Some truly marvelous ideas Jenny - and I must get one of those little pairs of scissors! I predict we will be seeing these things in airports all round the world before too long. I already use a multi-compartment zippered neck pouch on flights for a pen, my specs and iPod touch loaded with recorded books and fav. music in case the airline doesn't have anything suitable.
Thanks Jenny for the photos and instructions. Love the new improved chatelaine! Very bright and useful! Love the visuals.
Jenny, thanks so much for taking the time to write out these instructions - I have a couple of friends in mind, these will make great Christmas presents!
Thank you Jenny, so practical, and I like the way you describe your process.
Cheers
Bronwyn
What a great idea - thank you so much for sharing your photos and the instructions!
Thank you very much for the detailed instructions. Very helpful for me.
I have spent a cold afternoon tucked up browsing sewing accessories and I came across your lovely chatelaine. It is the happiest looking and most practical of all I have seen and has inspired me to design my own. Thanks for your hints on customising it and I especially like the tip to put something inside the pincushion to prevent pricking yourself. Great project!